Sound Voltex Nemsys Volume Assembly
KONAMI #116041110000, original
Note: This section references the Konami Nemsys Booth Volume AssemblyPlease consult the breakdown diagram for what each numbered part corresponds to. Where available, off the shelf parts are listed with their respective product link on Misumi. Where applicable, some domestic American part equivalents are listed on McMaster Carr.
- 1. VOLUME BASE
- Konami Part #114544800000
- U Bracket. Has a 10mm hole in the center to house a bushing and a slot for the potentiometer assembly tab to fit into.
- 2. BOTTOM BUSHING
- Konami Part #114502350000, Oiles 80F-0803
- Polyacetal Bushing, self lubricating, for specs and operating range see its product page.
- 3. VOLUME SHAFT
- Konami Part #114544810000
- 6mm to 6mm female to male coupler/extension shaft that adapts the pot's stem to the knob head. Has a hole directly above the coupler for a φ1.6mm L12mm dowel (a) that the torque limiter sits on. Takes 2x M4x4 hex set screws (d) with "W point" cup and conical tips to couple to the pot shaft. The bottom-most part of the shaft is 8mm in diameter, which is why the bottom bushing is larger than the top.
- 4. TORQUE LIMITER
- Konami Part #114532410000, TOK TLE1-618-5W
- A hysteresis bearing type torque limiter, commonly used in expensive printers on paper feeders. Smooths and dampens rotations from jitter and excess spinning. For specifications see Tok's respective product page
- 5. VOLUME COVER ASSEMBLY
- Konami Part #114987010000
- Meta part assembly consisting of parts 8 and 9, below.
- 6. VOLUME KNOB
- Konami Part #116057580000
- The metal thing you turn with your hands. Machined out of solid aluminum, takes 2x M4x5 hex set screws (c) with "W point" cup and conical tips to secure it to the 6mm shaft. φ30/H25mm, has a lip to prevent backing out and is ribbed. A few vendors sell an aftermarket knob compatible with the arcade cabinets.
- 7. VOLUME ASSEMBLY
- Konami Part #114544790000 for the L bracket, #114502880000 for the pot, nut and washers.
- The potentiometer is a Sensatec ELV-24Y36A-K which is now discontinued. See the linked page for equivalent alternatives. It comes with the necessary fastening hardware.
- 8. VOLUME, COVER
- Konami Part #114981620000
- Bracket that mounts to the back of the deck. Has an 8mm hole with slots on either side for the top bushing and set tabs of the torque limiter to go in. Has threaded shafts riveted in the sides for 2x M4 serrated wing hex nuts to attach the bottom assembly. The other 4 holes are to mount to the back of the deck and take the same nuts. About 3mm thick.
- 9. TOP BUSHING
- Konami Part #111747600000, Oiles 80F-0603
- Same material and thickness as bottom bushing, just smaller to accommodate a 6mm shaft instead of an 8mm shaft. The most vulnerable part of the assembly.
- 10. WASHER
- Konami Part #115159030000, 2mm thick, 6mmID 10mmOD Nylon Washer
- Spaces the knob from the bracket so it doesn't rub, also acts as a tension fit component to keep the top bushing in place. Commonly misplaced when removing the knob.
🔗Known Vendors
- https://yubiparts.com/collections/sound-voltex-knob-parts
- https://bluespringexpress.net/collections/all?page=2
🔗Games Using This Part
🔗Hardware Using This Part
No known hardware uses this part.
🔗Images and Diagrams
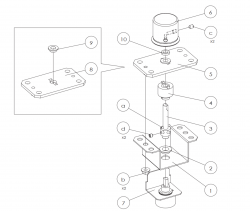
SDVX VOL Breakdown
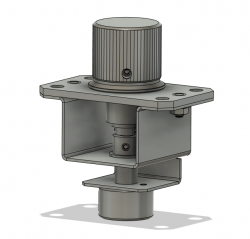
Assembled SDVX VOL Render
🔗Repair Manuals
No manuals currently added.
🔗Repair Tips
🔗 Common Failures
Sorted from most to least common:
- TOP BUSHING
- Diagnosis: if you can grab the knob head and it has a bit of side to side sway, this thing is probably bad.
- Handbladers kill these, and they're probably underbuilt otherwise. At least they're cheap.
- WASHER
- Diagnosis: You occasionally feel rubbing when twisting the knob or it has some play.
- These are fairly often lost by operators as the knobs are super hard to get off so the washer will just go flying. If you don't have one replace it immediately, also replace your top bushing as these two things work together to prevent lateral movement and the bushing from backing out and getting damaged.
- TORQUE CONVERTER
- It is hard to see if this part has failed without taking apart the assembly. It is a plastic bearing and so it might start to "click" if it gets something in it. These generally correspond to bad or heavy knob feel if that feel persists after replacing the bushings and cleaning the assembly. They're unfortunately not cheap to replace but are hard to service. You can try lubrication as a solution.
- These have a second potential failure as their set tabs are plastic. This means that if the bushing is far gone these tabs will take the brunt of the force and can shear off. It's not common for this to happen but if it has the failure is spectacular. If you're lucky enough to witness this you should replace everything nonmetal except for the pots so long as they still work.
- POTENTIOMETER
- See: ELV-24Y36A-K
🔗 Preventative maintenance
Before disassembly you can generally see whether the knob needs servicing if it has any lateral play or if it has uneven damping characteristics (“heavier” knob feel at certain repeatable points in the turn).There is a lot of slop in the assembly. When reassembling, take care in realigning everything and torque down the hex nuts slowly alternating nuts to prevent the U-Bracket from slipping and messing with the assembly alignment. Take care to not overtorque the hex nuts or especially the set screws into the coupling shaft. The shaft is made of a soft mild steel and the set screws are generally harder, so overtightening the set screws will deform the shaft and require deburring and/or sanding and polishing. If your set screws are regularly becoming loose over time consider a threadlocker, but use a low strength threadlocker such as Loctite 222 purple.The nemsys knobs have a particular weakness lateral torque, as the part that endures all of that is one plastic bushing, at the top. A common infamous playstyle, handblading, encourages this kind of force. Arcade ops have tried posting signs but ultimately depending on who plays on your cabinet you may find yourself replacing this part often or they may end up eventually looking like this. I suspect that knob was missing a washer, the top bushing was basically gone and the setting tabs on the torque converter had broken off. I'd recommend putting in a new top bushing every time you change your switches or as needed. At ~50c/u they're inexpensive and easy to stock up on. The bottom ones usually stay in pretty good shape.Lubrication is an option that will help reduce regular wear on the bushings, though it will not defend against handblading. Try to pick something that is plastics safe, specifically for POM plastics and nylon such as a suspended silicone or PTFE grease. I use Super Lube 21030 Grease. Other lubricants like lithium grease are a poor choice because they degrade the plastics in the torque limiter and bushings causing them to wear out faster.The torque limiter is a key contributor to knob feel in both smoothness of actuation and damping but is relatively unserviceable short of replacing it wholesale. These can go bad over time because it uses a sealed acetal bushing between the input and output, but the seal isn’t very good so it can get particulates in the bush. This can occasionally lead to a grindy feeling when turning the knob or nonlinear torque response even after replacing the bushings and polishing the shaft because the particulates have scored the bush. In order to prevent this on a new torque limiter you should firstly attempt to keep the knob assembly clean and particulate free through regular cleanings. You can try a plastics safe oil like Super Lube 51004 which should reduce particulate wear and scoring on the bush in the torque limiter and may also flush out existing particulates. As the bush is sealed you kind of just have to lay on the oil thick and let it penetrate. The newer TOK TLEU1-618-5W on Valkyrie knobs seems less prone to this issue overall because of its better seal and less vertical play but also because it has a sintered bronze bush instead of an acetal bush. Unfortunately, thanks to its dimensions differing it cannot be fit onto a Nemsys generation volume assembly without machining a new coupling shaft.
🔗 The Potentiometer Assembly seems loose
Upon first opening a SDVX deck and inspecting the knobs you might be surprised that you can wiggle the bottom piece, or should you dismount it from the deck, it rattles when you shake it. The reason this happens is the potentiometer-mounted L bracket's setting tab is slightly smaller than the slot in the U bracket. Believe it or not this seems to be intentional and isn't some kind of tooling precision issue on Konami's part or otherwise some kind of failure mode.The way the pot assembly just kind of hangs from the coupler makes it structurally decoupled from the rigid upper assembly, so it's inherently not load bearing. The whole assembly can move about 3 degrees either way before it "catches" and the pot starts spinning. This might be to smooth out the startup torque of the knobs or something.
🔗 Dao "AC Knob" Compatibility
Cabinet owners may be dismayed when they find that their pristine dao "AC knob" set doesn't just bolt up to a SDVX cabinet. The mounting pattern is incompatible as are the dimensions on the coupling shaft so the bushings do not fit either. Some of the failure prone parts are the same and can be swapped over into a SDVX Vol assembly. This includes the torque limiter, potentiometer and knob head.
🔗 I feel like parts are rubbing when turning the knob
Check if your knob head has a washer. If not you can push it down enough to where it will rub against the bracket. As a stopgap measure, back out the knob head a little bit and tighten it down. Order a washer and some new bushings.If your knob assembly has a washer but it's still rubbing, this is because the alignment of the U bracket and the top bracket is wrong. Undo the serrated nuts and realign them then tighten. Be sure to look and see if the shaft is completely perpendicular. If not you will see the knob head kind of wiggle up and down and catch at certain points when turning. This happens because the holes in the U bracket are very large and care was not made in aligning them before tightening.
🔗 The knob head is difficult to remove/shaft is all chewed up
This happens by over-tightening the set screws on the knob head and/or having the wrong tipped set screws in the knob head. The coupling shaft is made of a softer metal than the set screws so overtightening can deform the shaft and create burrs the knob head catches on. This makes removal of the knob head difficult, even after completely removing the screws. To fix this, you'll need to somehow remove the knob head. I sprayed a penetrating oil in the set screw entry points after completely removing the set screws and very slowly wiggled the knob loose with a pry tool. This can break the washer so be careful.Once the knob is free, you need to deburr the shaft. A stone grinding wheel works well for this task. After deburring you might want to buff/polish the surface with a rubbing compound. Replace the set screws if the tip is not the factory correct double point tip. Clean the knob hole before replacing the knob. Before tightening, it should come off more easily now. Instead of overtightening your set screws again, instead use a threadlocker so the set screws don't back out from normal play and hand tighten until the knob no longer comes up freely, then tighten one quarter turn beyond that.