pop'n music
Konami (1999-2021)
🔗Known Hardware
Bemani PC (ADE-704A)
- pop'n music 23 éclale (Type F, 2nd gen HD Cabinet)
- pop'n music 24 うさぎと猫と少年の夢 (HD Cabinet)
- pop'n music 25 peace (HD Cabinet)
- pop'n music 26 解明リドルズ (HD Cabinet)
Bemani PC Type 3 (Variant A)
- pop'n music 15 Adventure
- pop'n music 16 Party
- pop'n music 17 The Movie
- pop'n music 18 Sengoku Retsuden
- pop'n music 19 Tune Street
- pop'n music 20 Fantasia
- pop'n music 21 Sunny Park
- pop'n music 22 ラピストリア
- pop'n music 23 éclale
- pop'n music 24 うさぎと猫と少年の夢
- pop'n music 25 peace
- pop'n music 26 解明リドルズ
Bemani PC Type 4
- pop'n music 19 Tune Street (Type E, 1st gen HD cab) (G_K39)
- pop'n music 20 Fantasia (G_L39)
- pop'n music 21 Sunny Park (G_M39)
- pop'n music 22 ラピストリア (G_M39)
- pop'n music 23 éclale (G_M39)
- pop'n music 24 うさぎと猫と少年の夢 (G_M39)
- pop'n music 25 peace (G_M39)
- pop'n music 26 解明リドルズ (G_M39)
DJ Main
- Pop'n Music 1
- Pop'n Music 2
- Pop'n Music 3
Firebeat
- Pop'n Music 4 (GQ986)
- Pop'n Music 5 (G_A04)
- Pop'n Music 6 (G_A16)
- Pop'n Music 7 (GCB00)
- Pop'n Music 8 (G_B30)
- Pop'n Music Animelo (GQ987)
- Pop'n Music Animelo 2 (GCA02/GEA02)
- Pop'n Music Mickey Tunes (GQ976)
Python 1
- Pop'n Music 10
- Pop'n Music 11
- Pop'n Music 12 Iroha
- Pop'n Music 13 Carnival
- Pop'n Music 14 Fever
- Pop'n Music 9
🔗Known Parts
- 120v R14 25W Spot Lamp (E17 Base)
- Asahi Seiko 720 A/B Coin Mech
- Asahi Seiko 730 A/B Coin Mech
- Circular T9 Flourescent 20W Bulb
- Konami IO-2 USBIO
- Omron V-10-1A4 Microswitch
- Sanwa Illumintated Dome Push Button
- Sanwa Lampholder
- Sanwa OBSA-LHS1F-LN Microswitch
- TOEI TC-L292 Monitor Chassis
🔗Images and Diagrams
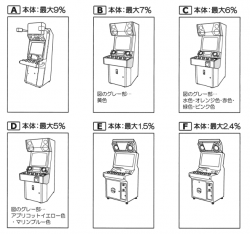
Excerpt from the pop'n music Sunny Park service manual noting the pop'n music cabinet types
🔗Repair Manuals
🔗Repair Tips
🔗 Button Refurbishing
If your buttons are sticking occasionally, you can refurbish them using Novus Plastic Clean & Shine. Push down on the white tabs and pull the button out of the black casing to remove the button top from the shaft. Then, you can clean dirt out of the button that can cause sticking. If the button still sticks, you can use Novus Plastic Clean & Shine with a felt polishing bit attached to a Dremel to smooth out the plastic parts of the button that contact the casing as well as the casing itself.
🔗 Replacement Screw Specifications for Standard CRT Cabinet
If your screws are missing or rusted, these are the exact replacements you will need:
- Top monitor glass metal piece screws - Truss head black oxide M4 0.7mm thread pitch 20mm length screws [1]
- Plexiglass marquee screws - Truss head stainless steel M4 0.7mm thread pitch 12mm length screws [2]
- Smoked plexiglass EQ meter cover screws - Truss head stainless steel M4 0.7mm thread pitch 8mm length screws [3]
- Control panel plexiglass screws - Button head hex drive stainless steel M4 0.7mm thread pitch 10mm length screws [4]
- Center speaker plastic side screws - Truss head stainless steel M4 0.7mm thread pitch 20mm length screws [5]
- Plexiglass how to play screws - Truss head stainless steel M4 0.7mm thread pitch 12mm length screws [6]
- Black side plastic lamp cover plexiglass screws - Truss head black oxide M4 0.7mm thread pitch 20mm length screws [7]